Showing posts with label recipes. Show all posts

November 16, 2016

Tried & True: Recipes From Pinterest You Need to Make {Pumpkin Edition}

pumpkin recipe roundup
I feel like the love for pumpkin flavoured goodies dies out sooner in Canada than in the States since our Thanksgiving happens so much earlier. When does "all things pumpkin" come to an end? End of November? After Christmas? I really don't know, but in case your still in the mood for some yummy pumpkin infused recipes, I've got you covered. This past month I made over a handful of different pumpkin recipes and today I'm sharing the best of the best with you. (If you want some actual meal recipe ideas, then be sure to check out last month's Pinterest roundup!).

*****

Easy Pumpkin Pie Bites: Pinned over 327 THOUSAND times!
A delicious alternative to pumpkin pie in bite size form!
You know what I find interesting (and frustrating) about Pinterest? The fact that a recipe can be pinned hundreds of thousands of times, yet there are no comments on the pin itself, and the blog post sharing said recipe has minimal to no comments on it as well. I for one, like to see what people have to say about a recipe: what worked for them,what substitutes did they make, did they love it...etc. This is why trying recipes on Pinterest are so hit and miss!

Thoughts: Anyway, thankfully, despite the lack of comments on this one, it was a winner. I made these for Thanksgiving dinner, and while my two younger nephews aren't a fan of pumpkin based desserts, it just meant the adults got to indulge in more! I made them the night before and didn't put the whipped cream on them until we were ready to eat them. I would recommend eating them within a day or two of making since the pastry does start to dry out, but they were still delicious!

Verdict: I loved the two-bite, cuteness factor. Although, I'm pretty sure I ate WAY more of these little bites than I would have of regular pumpkin pie. Thanksgiving dinner calories don't count, right?

*****

Healthy One Bowl Pumpkin Banana Muffins: Pinned 715 times
Healthy Pumpkin Chocolate Chip Muffins
Thoughts:  I wanted something my husband could throw in his lunch for a snack, and something I could grab on my way out the door. These were both delicious and filling. The pumpkin flavour is not strong in them at all - I would probably use pumpkin pie spice next time to amp it up, but otherwise, these would be a great year round muffin to make!

Verdict: These were a big hit with both myself and my husband. Even my toddler, who is funny about muffins, would eat about half of one before declaring "I'm done!". I think the chocolate chips helped.

*****

Chewy Pumpkin Chocolate Chip Cookies: Pinned over 103k times

Thoughts: The texture and chewiness was so different than your average cookie, but my husband and I loved that about them!  I'd probably try and cut down the sugar next time I make them, but they were still really yummy. The dough is definitely a bit odd to work with, and make sure you listen and chill your dough for the recommended amount of time! I ended up pressing my chocolate chips into the tops of the cookies before baking as it just seemed easier this way than trying to mix them into the sticky dough. (These got eaten up before I thought to take a photo!)

Verdict: I really, really loved these cookies. And my toddler ate them too, so that's always a win! They reminded me of a nice, chewy molasses cookie, but with a slight pumpkin flavour.

*****

Pumpkin Pie Spice Chex Mix: Pinned 30 times
A delicious holiday party snack!

Thoughts: Okay, this one is a little self-promotion here because this is a recipe I posted the other week, but seriously, if you missed it, you need to make this one! It's the perfect holiday snack, whether it's for Friday movie night or a party. It's easy, delicious and a great way to have your pumpkin pie spice without using any actual pumpkin.

Verdict: Obviously, make it!!


Over to you:

Pumpkin desserts: love 'em or hate 'em?

Favourite pumpkin snack/dessert? Share your recipe in the comments! 


November 04, 2016

Pumpkin Pie Spice Chex Mix


The holidays are upon us, and chances are good that you will attend at least one dinner or party in which you are asked to bring a snack. Or maybe not, but if you're like me, you hate to show up empty handed. While a bottle of wine is always a nice gesture to bring your host, sometimes it's more pleasing to think outside the box and bring something homemade. Or maybe you you just need a really tasty snack in your home that you don't plan on sharing at all. Hey, I'm not judging!
The perfect pumpkin pie spice snack for the holidays
Whatever the case, I've got you covered! I've made this Chex mix recipe several times now, and it's been a big hit with both my own family and the guests receiving it. I'm warning you now, it's hard to stop at just a handful. 

The ingredients are simple, and this is the perfect way to infuse some pumpkin spice into your snacks without baking. Whipping up a batch takes no time at all, and I promise you this is a recipe you'll keep coming back to. Throw it in a mason jar, add a ribbon, and you have yourself the perfect hostess gift!
pumpkin pie spice snack

Pumpkin Pie Spice Chex Mix
(adapted from Peanut Butter Fingers)

Makes approximately 8 cups of Chex Mix

6 cups Rice Chex cereal
1/4 cup butter
1/4 cup brown sugar
1 tbsp pumpkin pie spice
2 tsp cinnamon
1 tsp vanilla extract
1 cup chopped pecans
1 cup chopped dried apple slices
1/2 cup dried cranberries
6 small-medium sized chopped oatmeal cookies

Directions:

1. In a small bowl, combine brown sugar, pumpkin pie spice and cinnamon.

2. In a large microwaveable bowl, combine Chex cereal and chopped pecans.

3. In a microwaveable dish, microwave the butter until melted (approx 30-40 seconds). Then add vanilla extract.

4. Pour butter mixture over the Chex cereal and pecans, then add the brown sugar and spice mixture from step 1. Stir until well coated. 

5. Place Chex mix in microwave and microwave on high for one minute increments, stirring after each minute. Repeat approximately 3 - 4 times, until mixture begins to brown. 

6. Stir in chopped dried apples, cranberries, and chopped oatmeal cookies. Allow mixture to cool before storing in an airtight container. 

Enjoy!

easy, pumpkin pie spice snack for the holidays


October 05, 2016

Tried & True: Recipes From Pinterest You Need to Make

Recipes from Pinterest you need to try via A Slice of Brie

Pinterest gets a bad wrap sometimes. Yes, I see how it can be the rabbit hole of pinning DIY projects you will never, ever make, ridiculous recipes you will never cook, or hairstyles your arms will never allow you to attempt. So what's the point, right?

If used correctly, I think Pinterest is pretty awesome. I've utilized it for fashion advice when I'm not sure how to style a certain pair of boots, I pin hair inspiration photos for my hair stylist, recipes for meal planning, and realistic DIY crafts that not only have I made, but didn't break the bank either.

I don't spend a lot of time on it, but the one thing I use it for almost daily, is meal planning. When I'm reading blogs or articles that share recipes that sounds like something I will make, I will pin it to my "yum - recipes to try" board. Or, if I'm looking for a certain type of recipe, I will search for it on Pinterest.

This is where things get overwhelming though. Recently, I realized I had over 250 recipes pinned in my recipes to try board. That's an insane amount of pins to scroll through each week I'm meal planning, or when I'm trying to find a particular recipe I've already made and want to make again. So, like I mentioned in this post, I organized my boards into recipes to try and tried & true boards. This way, at least the recipes I've already tried and will definitely make again, I can move over to one of my tried & true boards. I can't even begin to tell you how awesome it is to have such organized boards! I also always make comments underneath the pin on any changes I may have made to the original recipe so I don't forget for the next time.

The other thing I find can be overwhelming or intimidating about using recipes on Pinterest to meal plan is, how do you even know said recipe is worth making? I mean, there are literally a billion pinned recipes on there. Some have tens or hundreds of pins, while others have thousands. But here's the thing with Pinterest - A LOT of people just pin for the sake of pinning, and never make a single meal they pin. So while I like to believe that a muffin recipe with 5 thousand pins is going to be a good one, sometimes you just don't know for sure.

That's where I come in! I use my Pinterest recipe boards almost exclusively for meal planning. I do have my favourite cookbooks, but overall, I just find it easier to use Pinterest if I can. For the most part, I'd say I've had a pretty good success rate with the recipes I've made from Pinterest. There have definitely been more than a handful of ones I would never make again though, and those I just delete off my boards right away.

Anyway, consider me your guinea pig if you will! I thought every month, I'd recap the recipes I've made from Pinterest that were big wins in our house and that I think you should make too. Essentially, I'm taking the guess work out of it for you ;)


DINNER RECIPES

Crock Pot Chicken Soup: Pinned only 6 times

Thoughts: I discovered this recipe thanks to Carly and I loved the simplicity of it over baking an actual chicken pot pie. I used leftover rotisserie chicken and just threw it in in the last hour of cooking or so. I know this easily could have been done on the stove, but it's nice to just throw things in the slow cooker and forget about it. This was huge hit with Sully. I knew I would want the comfort of the crust found in traditional pot pie, so I made some quick Pillsbury biscuits to go with it.

Verdict: Comfort food at it's finest. and this literally took minutes to throw into the slow cooker. Perfect for those cold days and when you don't have a lot of time. If you use raw chicken, then you will need to give it more time to cook.

Slow Cooker Pot Roast with Potatoes: Pinned over 7k times

Thoughts: I also snagged this recipe from Carly, and I was intrigued because I love pot roast, but I've never done it in the slow cooker before. It was super simple and smelt amazing while cooking. Unfortunately, I wasn't really thinking and I bought a higher quality cut of roast since it was the same price as the lesser quality, so this meant my cut was way more lean and wasn't as tender as I like a roast to be. That being said, had I been thinking, I could have cooked it for a shorter amount of time and it may have come out more tender. Lesson learned!

Verdict: Definitely a must make. The leftover juices make for a delicious gravy or Au Jus. Consider choosing a fattier cut of roast so yours doesn't dry out like mine did.


BAKING RECIPES

Chocolate Chip Zucchini Bread: Pinned over 50k times
Recipes from Pinterest you need to try
Thoughts: I had a ton of zucchini last month to use up from my grandma's garden so I knew I wanted to bake with it. I perused a bunch of loaf recipes before deciding upon this one. I liked that I already had everything on hand to make it and that the only sweetener it called for was honey. It did call for white whole wheat pantry which I didn't have (and didn't even know was a thing), so I took my chances and used all-purpose flour with good success.

Verdict: You guys, this was THE BEST loaf I have ever made. So delicious, and moist! We gobbled it up in just a few short days. I'm not sure I'll ever make another loaf again.

Chocolate Zucchini Banana Muffins: Pinned 7.5k times
Recipes from Pinterest you need to try
Thoughts: Figured these would be a hit with the toddler, and I was right. I used coconut oil for the oil and brown sugar, but half the amount the original recipe called for and they were still moist and sweet. We topped with sprinkles instead of sugar as well.

Verdict: Definitely a fun way to disguise zucchini in chocolate. Super moist and Sully asked for one every single morning until they were gone.

and last but not least...

5 Ingredient Banana Almond Butter Muffins: Pinned 12.5k times
Recipes from Pinterest you need to try
Thoughts: Super easy to make and ingredients I always have on hand and I liked that the batter was blended in a high speed blender for a really smooth consistency. I added peanut butter chips to my batter and baked in a mini muffin tin for about 9 minutes.

Verdict: I loved these, as did Jim, but for some reason, Sully was not a fan. I thought they were the perfect little snack for me throughout the day as I found just one or two very satisfying.


Over to you:

Do you love or hate Pinterest?

How do you like to use it? Do you make recipes you pin on there?


September 08, 2016

Easy, Homemade Cinnamon Apple Butter


I am not fortunate enough to have my own apple trees, but should you be so lucky, I'm sure you have an overabundance of apples this time of year! Or maybe you know someone begging to get rid of their extra apples, but you're not sure what to do with them all. Well, I've got you covered with this incredibly easy, homemade apple butter recipe! If you've never had apple butter before, then you need to fix that. Apple butter is thicker than your average apple sauce, and in my opinion, much more tasty. You can use any type of apple you wish, but this is the perfect recipe to use up those apples in your backyard!
Homemade Apple Butter recipe via A Slice of Brie

About a month ago, I visited my grandma out on her farm. Not only did I come home with a huge haul of fresh veggies from her massive garden, but I grabbed as many apples off her apple tree that I could without seeming greedy. Unfortunately, with the heat and the long drive home, not all of them remained crispy or appetizing for eating as is. Not wanting to waste them, I decided to try my hand at making apple butter. After perusing many, many recipes on how to make it, I realized how easy it was going to be and I got to work!

The beauty of apple butter is the apples can be soft, bruised and of any type. Crab apples work great too, or really, you could use any apple variety of your choosing. The apples from my grandma's farm are sweet and delicious so I was confident I wouldn't need much sugar for the butter. I highly recommend when making this recipe, that you follow the less is more rule. Taste your butter as it's simmering and sweeten accordingly. Some recipes I came across utilize an obscene amount of sugar! But then again, some apples are going to be more tart than others. I prefer my apple butter to be more on the savoury side, but to each their own!
Homemade Apple Butter recipe via A Slice of Brie

Easy, Homemade Cinnamon Apple Butter

4 pounds of apples (seeded, cored and quartered)
2 cups of water
1/3 cup of brown sugar*
1 tbsp cinnamon
1 tbsp vanilla extract
1 tsp lemon juice
1 cinnamon stick (optional)

Directions:

1. Seed, core and quarter your apples, but leave the skins on

2. Add apples to a large pot and add 2 cups of water. Bring to a boil. (The water will not cover your apples entirely, that's ok!)

3. Once a boil is reached, turn heat down to low. Simmer apples for 15 minutes until they are soft and mushy. You should be able to easily mash the apples with a fork.

4. If you have a high speed blender (I used my vitamix) then add the contents of your pot to it. You could also use an immersion blender here. Blend the apples on high until smooth. With a powerful enough blender, you won't need to strain out the peels this way. If you don't have a high speed blender, then you will need to strain the apples through a fine strainer.

5. Place the pureed apples back into the large pot. Add the remaining ingredients and bring back to a boil, then reduce heat to low and simmer for 30-60 minutes to allow the apple butter to thicken. If you want an extra kick of cinnamon, you can throw in a cinnamon stick or two as the pot is simmering. Different types of apples contain different amounts of pectin, so one type may yield a thicker butter than another.

6. Remove cinnamon stick (if used) and divide apple butter among mason jars. My batch yielded about 6 cups of apple butter. I placed the lids of the mason jars on while the apple butter was still hot which creates a pretty solid seal. Your apple butter will last in the fridge for at least 2-3 weeks. If you prefer, and have the necessary equipment, you could properly jar the apple butter for a longer shelf life.

*As your butter is simmering, you can taste it for sweetness and add brown sugar as you feel it's needed. 

Confession: I enjoy my apple butter straight out of the jar, much like you would apple sauce, but oh my goodness, it is so much more delicious! Spread on toast is another lovely way to consume it, or even mixed in oatmeal or Greek yogurt. There's no wrong way to enjoy it!

Homemade Apple Butter recipe via A Slice of Brie


March 03, 2016

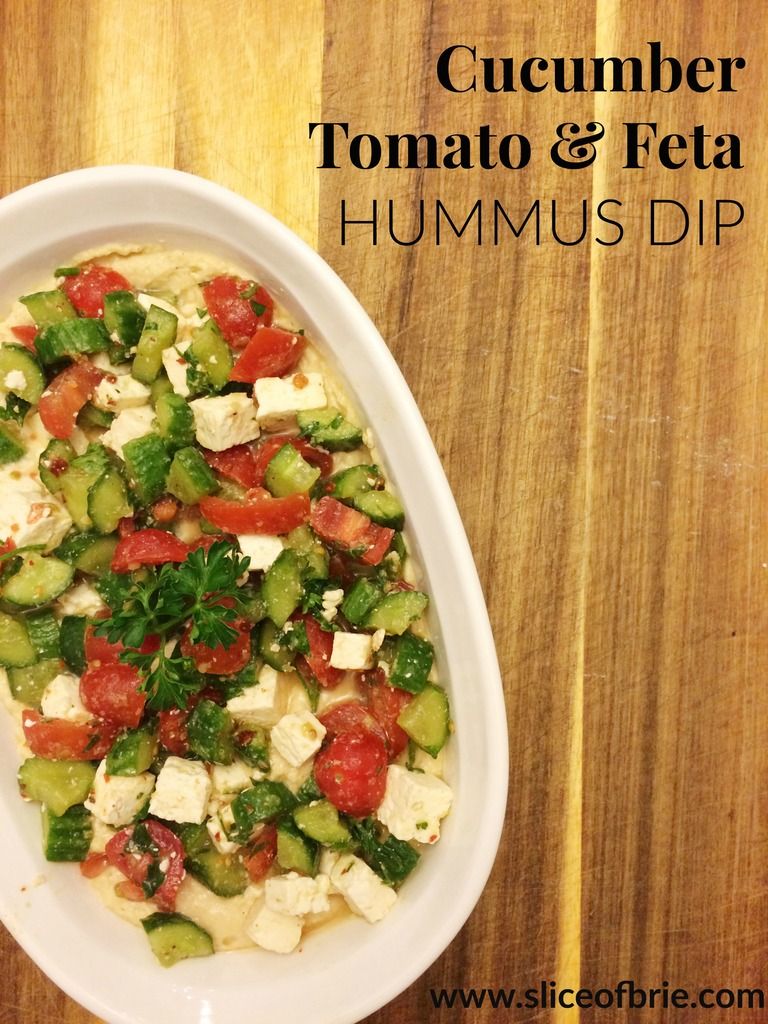
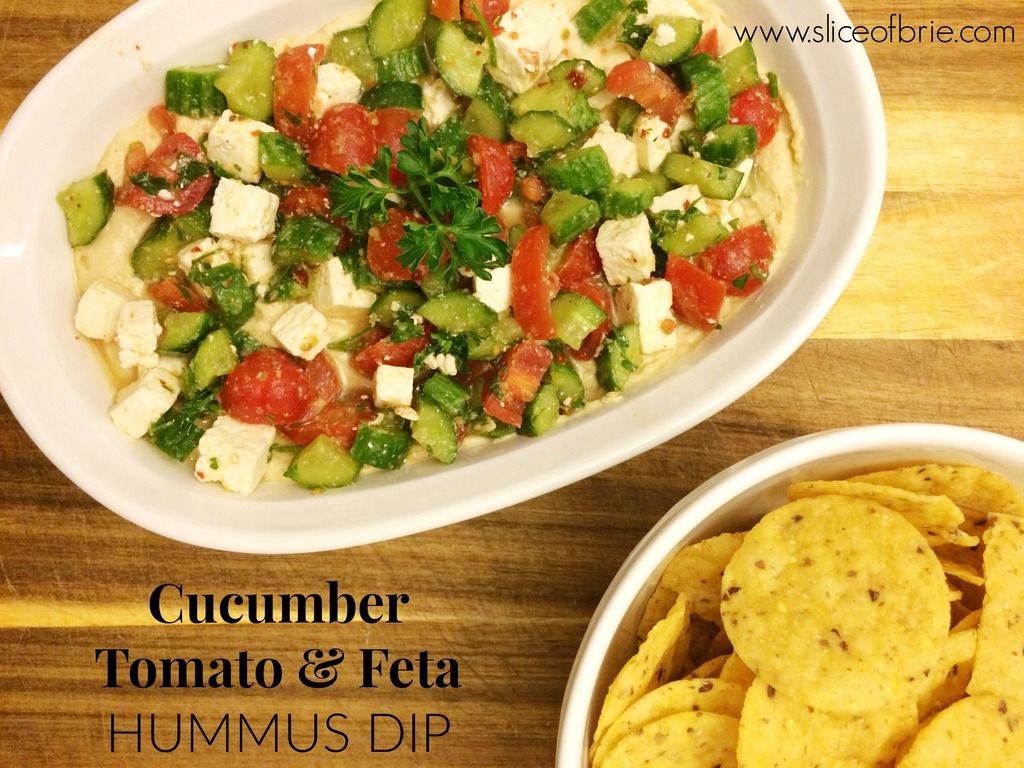
Cucumber Tomato & Feta Hummus Dip

It's pretty much a given, that if you invite me to your house and ask me to bring something to eat, this is the dish I'm going to bring. 

Life is busy, and while I love trying new dishes, I find it really stressful when you have to come up with something to bring to a potluck, or a party. What if no likes what you bring? (My worst fear). 

For a long time, I always wished I had my own "signature" potluck/party-going dish. Something I could be counted on to bring and something people looked forward to eating. And something that didn't take a ton of time to prepare, and calls for minimal ingredients. Friends, I'm happy to say, I finally have that dish!

I first ate a version of this at one of my book club meetings back when I was still living in Edmonton, and I absolutely loved it. I knew I needed to try and recreate it at home. It takes your regular old hummus with veggies and kicks it up a notch. It looks appealing, it's healthy and you it will also satisfy any of your vegetarian friends out there. Or you can make it vegan by skipping the feta altogether (which I have on numerous occasions when I don't have any on hand, and it still tastes just as delicious). 

Cucumber Tomato & Feta Hummus Dip


Cucumber Tomato & Feta Hummus Dip

1 pint of grape tomatoes, halved
1 small cucumber or 4-5 mini cucumbers, diced
1/2 cup cubed feta
1 tbsp chopped parsley (optional)
Hummus (approx half a container)
1 tbsp olive oil
1-2 tsp crushed red chili pepper 
salt & pepper to taste

Add the tomatoes, cucumber (I prefer to leave the skin on as it adds a nice crunch), feta and parsley to a bowl.  

Drizzle with the olive oil.

Toss with crushed red chili pepper, salt and pepper. I usually taste test here and add more chili, salt, or pepper as I feel is necessary. 

Let sit for at least 30 minutes, but if you're in a rush, that's okay too. Sometimes I even make this part the night before to really 'marinate' the flavours. Either way, it will stay taste great. 

Spread a thin layer of hummus on the bottom of the dish you will serve the dip in. I typically use about half of a regular sized container of hummus, but you can use more if you wish. You will want to use a dish that has a lip. 

Using a slotted spoon to drain the excess liquid, top the hummus with the cucumber, tomato and feta mixture. Depending on the size of dish you use, you may have some mix left over. 

Serve with your choice of crackers or tortilla chips! 

This keeps well in the fridge for 3-4 days.

Cucumber Tomato & Feta Hummus Dip


What's your go-to potluck or party dish?


November 20, 2015

Flu Fighter Smoothie

flu fighter smoothie


This past week, I've been battling another cold. That's two already this fall! Besides my usual arsenal of upping my vitamin D intake, drinking hot water with lemon and honey, and trying to get to bed at a decent time, my go-to remedy has been a smoothie packed with vitamin C and ginger.

This smoothie is so delicious that I'd be lying if I said I didn't drink it regularly, regardless of whether or not I'm feeling under the weather.

I'm also a big fan of it because I generally have all the ingredients (which there aren't many of), in my fridge at all times. Did you know you can keep your fresh ginger in the freezer and then just pull it out and grate it as you need it? This way it's always possible to have ginger on hand. Plus, I actually find it grates nicer when it's frozen.

Next time you're feeling run-down, or craving a glass of orange juice, go ahead and make this smoothie. It feels like you are indulging, but really you're just giving your immune system a nice boost.


Flu Fighter Smoothie
(slightly adapted from The Oh She Glows Cookbook)


Makes approximately two servings

1 cup orange juice
2 oranges, peeled
1 tsp fresh, grated ginger
2 tbsp lemon juice (fresh if you have it)
1 tbsp maple syrup
6 ice cubes


Add all the ingredients into a high-speed blender in the order they are listed. Blend until smooth. Enjoy!

It is possible to make this smoothie without orange juice, if you have a powerful enough blender. I just prefer to use orange juice if I have it on hand as it yields more smoothie as a result. And since this smoothie is so delicious, that's a good thing!

  flu fighter smoothie


*affiliate links have been used

October 22, 2015

Caramel Apple Nachos


Caramel Apple Nachos

For years, and I do mean years, whenever I was asked to bring a dish to a potluck dinner, you could count on me to bring a 7-layer dip. But not a homemade one, a store bought one of course. On the off chance that I was asked to bring a desert, then I grabbed whatever looked delicious at the grocery store.

I think you could attribute this to equal parts laziness and wanting to play it safe. What if no one liked or ate what I went to all the trouble to make on my own? I'm not set up for that kind of humiliation. Everyone likes a 7-layer dip though.

In the last few years though, chalk it up to age, I guess, I've gotten much more adventurous in the pot-luck dinner contribution. And a little less lazy. Now, I find it fun to bring something new that I am actually proud to brag about having made on my own. I never take anything I've never tried out on my own family first though. I'm not THAT confident yet.

So where am I going with this? The key to bringing something fun and delicious to a pot-luck dinner is to have a small list of a few "tried and true" recipes. Simple ingredients, simple instructions and guaranteed to be hits.

Caramel Apple Nachos checks off all the boxes. And the best part is, it can pass as a fun appetizer OR a healthy(er) dessert option! Win, win!

Here's all you need:

Caramel Apple Nachos


Caramel Apple Nachos

4-5 Apples (I used Honeycrisp because they are my favourite, but they can be pricey.).
Lemon Juice
Chocolate Chips
Shredded coconut (sweetened or unsweetened - I prefer unsweetened)
Pecans, roughly chopped
Caramel Sauce

Caramel Apple Nachos
Slice your apples into thin, even slices.

Spread out apple slices onto a plate or platter, or even a shallow casserole dish.

Pour a little bit of lemon juice into a bowl and then brush all apple slices with it. This will prevent your apples from going brown before you even serve your dish. In all the times I've made this, the lemon juice was undetectable.

Sprinkle the chocolate chips, shredded coconut and chopped pecans evenly over the apple slices.

Drizzle caramel sauce all over.

Caramel Apple Nachos

Super easy and yummy! And the topping options are endless (there are about a million and one versions of this floating around the Internet). You can mix it up to suit what you have on hand or what you like. I made this one based on what taste combinations I prefer and what I already had in the pantry. Sully will not eat apples unless they are in sauce form, but one day, when he comes around to them, I see myself making this in mini portions as a fun snack or desert!


What's your go-to potluck dinner appetizer or dessert?


July 18, 2014

Watermelon Strawberry Smoothie


watermelon strawberry smoothie


Nothing says summer quite like fresh watermelon does! It's my favourite fruit this time of year and it definitely helps that it's a guilt free one. Low in calories, high in water content and an excellent source of vitamin A and C makes watermelon a welcome addition to your summer diet. 

With temperatures sky high this week, I found myself craving ice-cold drinks to quench my thirst. But water just wasn't cutting it anymore. So with a fridge full of cut up watermelon, I threw together this refreshing watermelon smoothie. Perfect for a mid-day pick me up or a cool desert!

Recipe (serves 1):

1 cup cubed watermelon
1 cup frozen strawberries
1/4 cup unsweetened vanilla almond milk
1/2 tsp of honey or sweetener of your choice (optional)

Blend all ingredients in a blender till smooth and enjoy!


watermelon strawberry smoothie